Summer memories often taste like sweet nostalgia. Banana pudding cheesecake cones capture that essence perfectly. They turn classic comfort desserts into a handheld treat that brings joy with every bite.
These creamy banana dessert cones are more than just a recipe. They’re a celebration of flavor and childhood delight.
Your taste buds are about to embark on an extraordinary culinary journey. The banana pudding cheesecake cones mix the rich, tangy texture of cheesecake with the smooth sweetness of banana pudding. All this is nestled in a crisp cone.
This isn’t just a dessert—it’s an experience that bridges generations of delectable memories.
Whether you’re hosting a summer gathering, craving a nostalgic treat, or simply wanting to surprise your family, these banana pudding cheesecake cones are perfect. They promise to be the star of any occasion. Get ready to create a dessert that’s as fun to make as it is to devour.
Introduction to Banana Pudding Cheesecake Cones
Get ready to discover a dessert that’s about to revolutionize your sweet tooth experience! Banana Pudding Cheesecake Cones are the ultimate no-bake treats. They combine the creamy richness of cheesecake with the classic comfort of banana pudding. These parfait cups are perfect for anyone looking to impress guests or enjoy a quick and delightful dessert.

Origins of This Delightful Fusion Dessert
The concept of combining banana pudding with cheesecake emerged from creative home bakers. They sought to reimagine traditional desserts. These innovative parfait cups bring together two beloved classics into a single, spectacular treat.
By transforming ordinary ingredients into an extraordinary dessert, home cooks have crafted a recipe. It’s both nostalgic and exciting.
Why This Recipe Works for Any Occasion
- Quick preparation (only 20 minutes of prep time)
- No baking required
- Serves 6-8 people
- Adaptable for various events
- Impressive presentation
Key Benefits of Making These Treats
| Benefit | Description |
|---|---|
| Easy Preparation | Simple ingredients and no-bake method |
| Make-Ahead Option | Can be prepared up to 2 days in advance |
| Crowd-Pleaser | Delicious and visually appealing dessert |
| Nutritional Value | Approximately 340 calories per serving |
Whether you’re hosting a summer party, family gathering, or simply craving a delightful dessert, these Banana Pudding Cheesecake Cones are your go-to solution. With minimal effort and maximum flavor, you’ll create a dessert that looks like it came from a professional bakery right in your own kitchen.
Essential Ingredients for Perfect Cheesecake Cones

To make the ultimate portable cheesecake, you need the right ingredients. These should bring out the taste of southern banana pudding. Start by picking top-notch ingredients that mix well to make a dessert you’ll remember.
Core Ingredients Breakdown
- Cream Cheese (8 ounces): The rich, creamy base of your cheesecake
- Granulated Sugar (1 cup): Provides perfect sweetness
- Vanilla Extract (1 teaspoon): Enhances overall flavor profile
- Sour Cream (1 cup): Adds tangy smoothness
- Heavy Cream (1 cup): Creates light, airy texture
Banana and Crunch Elements
- Banana Puree (½ cup): Extracted from 2 ripe bananas
- Crushed Vanilla Wafers (½ cup): Brings classic southern banana pudding crunch
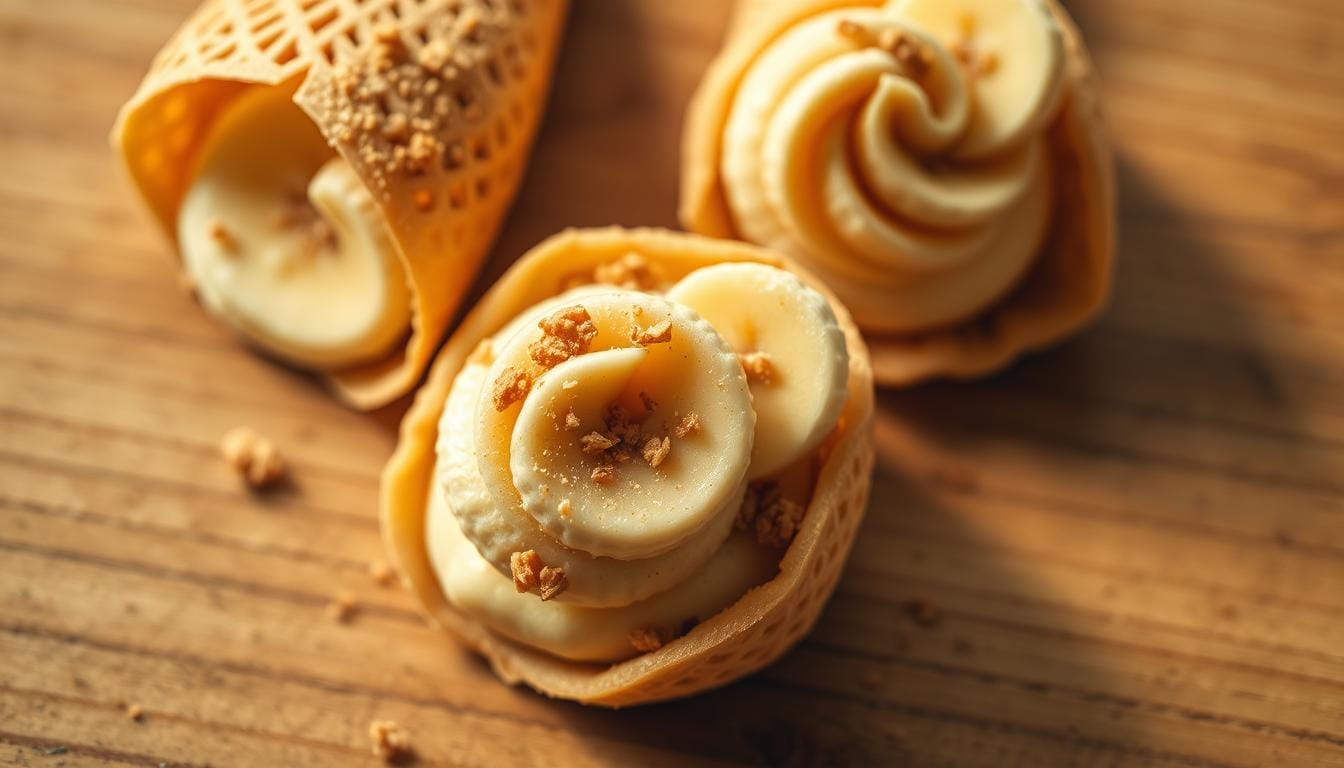
- Waffle Cones (12): Serves as portable cheesecake vessel
- Fresh Bananas (2): Sliced for topping
Choosing ripe bananas is key for real flavor in your cheesecake. The mix of creamy filling and crunchy waffle cone makes a unique dessert.
| Ingredient Category | Quantity | Purpose |
|---|---|---|
| Dairy Base | 8 oz Cream Cheese | Creamy Foundation |
| Sweetener | 1 cup Sugar | Balanced Sweetness |
| Banana Element | ½ cup Puree | Authentic Flavor |
| Crunchy Element | ½ cup Vanilla Wafers | Textural Contrast |
Your portable cheesecake will become a tasty treat. It will bring the spirit of southern desserts to your hands.
Kitchen Tools and Equipment Needed
To make tasty easy summer desserts, you need the right tools. Your banana pudding cheesecake cones will be easy to make with the right equipment. It’s simple when you have everything ready.
Essential Mixing Equipment
For your vanilla wafer crumbs dessert, you’ll need some important tools:
- Large mixing bowl (4-5 quart capacity)
- Electric hand mixer or stand mixer
- Measuring cups and spoons
- Rubber spatula
- Whisk
Serving and Presentation Tools
For a great look on your easy summer desserts, get these items:
- Piping bag or large zip-top bag
- Waffle cone holders
- Sharp knife for slicing bananas
- Cutting board
- Offset spatula for smooth filling
Storage Containers
Keep your treats fresh with these storage solutions:
- Airtight container with lid
- Plastic wrap
- Refrigerator-safe storage boxes
With the right tools, making banana pudding cheesecake cones is easy. They’ll impress everyone with their look and taste.
Step-by-Step Preparation Guide
Making mini dessert cones is all about careful prep and detail. This guide will help you make these treats step by step.
First, get all your ingredients and tools ready. For the banana pudding base, whisk together your main ingredients. Here’s how to start:
- Combine milk, sugar, cornstarch, and salt in a saucepan
- Cook the mixture until it thickens consistently
- Stir in vanilla extract
- Allow the pudding to cool completely
Then, work on the cheesecake filling. This is where your cones will shine. Beat the cream cheese until smooth, adding sugar and vanilla slowly. Aim for a light, creamy texture that matches the banana flavors.
- Beat cream cheese until completely smooth
- Gradually incorporate sugar and vanilla
- Fold in sour cream and heavy cream
- Gently mix in banana puree
- Add crushed vanilla wafers
- Sprinkle in a touch of cinnamon
When making individual portions, be precise. Use a piping bag to fill your cones evenly. This ensures your cones look great and taste amazing.
Pro tip: Chill your cones for at least 4 hours before serving. This lets the flavors mix and the filling set. Your effort will pay off with a fantastic dessert.
Creating the Perfect Cheesecake Filling
Making a creamy banana dessert is all about precision and passion. Your journey starts with making a filling that turns waffle cones into special treats.
For a top-notch cheesecake filling, choose the best ingredients and learn how to prepare them. Start with 8 ounces of softened cream cheese. Beat it until it’s smooth using an electric mixer.
Achieving the Right Consistency
Getting a silky, lump-free mix is key. Here’s how to make it perfect:
- Beat cream cheese at room temperature for 3-4 minutes
- Use an electric mixer on medium-high speed
- Scrape down mixing bowl sides periodically
- Ensure no visible cream cheese lumps remain
Incorporating Banana Flavors
Add fresh banana puree to make your dessert even better. Use ½ cup of ripe banana puree. It adds natural sweetness and flavor.
Adding the Perfect Sweetness
When sweetening, balance is everything. Mix 1 cup of sugar with 1 teaspoon of vanilla extract. This makes the mix light and fluffy, just like banana pudding cheesecake.
Pro tip: Whip heavy cream separately and fold it into the mix. This makes your cheesecake light and airy, great for any event.
Assembly and Decoration Techniques
Making mini dessert cones is all about precision and creativity. Your Banana Pudding Cheesecake Cones will be a hit with the right assembly. Begin by getting your work area ready with all ingredients and tools within reach.
Here are the essential steps for perfect assembly:
- Chill the cheesecake filling for 30 minutes before filling
- Use a piping bag or spoon to fill cones ¾ full
- Ensure even distribution of filling in each cone
- Leave space for additional toppings
When decorating, focus on looks and flavor. Add a dollop of whipped cream to each cone for a beautiful peak. Top with banana slices and crushed vanilla wafers for extra taste and texture.
These individual treats are super versatile. You can customize each cone with different toppings, making them great for parties or small gatherings. Try adding chocolate shavings, caramel drizzle, or cinnamon for a fancy touch.
Pro tip: Assemble these cones just before serving. This keeps the waffle cones crisp and your toppings fresh. Your guests will love these elegant, creamy, and crunchy desserts.
Storage Tips and Make-Ahead Options
Creating tasty easy summer desserts needs smart prep. Your no-bake treats can be made ahead with simple storage tips. This keeps your Banana Pudding Cheesecake Cones fresh and yummy.
Storing your dessert right is key. These cheesecake cones are great for busy summer events. They can be made ahead of time.
Proper Storage Methods
- Store cheesecake filling in an airtight container
- Refrigerate for up to 2 days before serving
- Keep cone components separate until final assembly
- Wrap individual cones in plastic wrap to prevent moisture
Maintaining Freshness
Keep your no-bake treats crisp and tasty with these tips. Separate wet and dry ingredients to avoid soggy cones. This keeps your easy summer desserts perfect.
Serving Temperature Guidelines
- Remove from refrigerator 15-20 minutes before serving
- Allow slight tempering to enhance flavor
- Serve chilled for best taste experience
- Do not leave at room temperature for more than 2 hours
Follow these storage tips, and your Banana Pudding Cheesecake Cones will be a hit. They’re both easy and delicious.
Variations and Creative Toppings
Make your southern banana pudding cheesecake cones special with exciting flavors and toppings. Try different ingredients to take these treats to the next level.
Here are some tasty ways to customize your banana pudding cheesecake cones:
- Caramel Drizzle: Add a rich caramel sauce for extra sweetness
- Chocolate Lovers: Drizzle melted chocolate for a deep flavor
- Nutty Crunch: Sprinkle chopped nuts like pecans or almonds for texture
- Fruit Infusion: Add fresh banana slices or berries for freshness
Vanilla wafer crumbs can change the texture and taste of your dessert. Try crushing different wafers for more complexity. For a gluten-free option, use gluten-free wafer crumbs or other cookies that match the banana pudding flavor.
Looking for dietary alternatives? Here are some ideas:
- Gluten-free cones and wafers
- Dairy-free cream cheese substitutes
- Vegan whipped cream options
- Low-sugar sweetener alternatives
Your banana pudding cheesecake cones can be a dessert for everyone. Be creative and make each batch your own!
Serving Suggestions and Presentation Ideas
Your banana pudding cheesecake cones deserve a stunning presentation. This will impress your guests. Portable cheesecake desserts are all about creating memorable experiences through creative serving techniques.
Transform your dessert into a showstopper with these exciting presentation ideas:
- Use decorative cone holders to prevent tipping and add visual appeal
- Create an interactive dessert bar where guests can customize their parfait cups
- Arrange cones on a multi-tiered serving stand for elegant display
- Garnish with fresh banana slices and crushed wafer crumbs
When serving parfait cups, consider these styling tips. Layer your whipped cream carefully, ensuring neat piping techniques. Sprinkle toppings evenly to create textural contrast. The goal is to make each portable cheesecake cone look as delightful as it tastes.
For outdoor events or casual gatherings, these cones offer unmatched convenience. Their portable nature means you can easily transport and serve them at picnics, potlucks, or backyard parties. Guests will love the individual-sized treat that combines classic banana pudding with creamy cheesecake.
Pro tip: Always serve chilled to maintain the perfect texture and prevent the filling from becoming too soft. A quick chill in the refrigerator before serving ensures your dessert remains picture-perfect.
Nutritional Information and Dietary Considerations
Your creamy banana dessert is not just tasty but also nutritious. It’s a mindful treat that balances flavor with health. Each Banana Pudding Cheesecake Cone is a guilt-free way to enjoy easy summer desserts.
Here are the nutritional highlights of our dessert:
- Calories: 86 per serving
- Total Fat: 4g
- Saturated Fat: 2g
- Cholesterol: 11mg
- Sodium: 44mg
- Total Carbohydrates: 11g
- Sugars: 7g
- Fiber: 1g
- Protein: 1g
If you follow special diets, don’t worry. This recipe can be adjusted for different needs. It’s a dessert that everyone can enjoy, whether you’re gluten-sensitive or lactose intolerant.
For those with allergies, there are substitutions. You can use gluten-free graham crackers or dairy-free cream cheese. This makes the Banana Pudding Cheesecake Cones safe for over 32 million Americans with food allergies.
Remember, it’s important to control your portions. While our dessert is nutritious, eating it in moderation is key. Enjoying these easy summer desserts in a balanced way is part of a healthy lifestyle.
Conclusion
Your journey to make banana pudding cheesecake cones has shown a tasty no-bake treat. It mixes creamy textures with amazing flavors. These 12 waffle cones are more than a dessert; they’re a special culinary experience.
The beauty of these treats is their simplicity and flexibility. With just 30 minutes of chilling, you can make a fancy dessert from basic ingredients. Whether it’s for a small party or a quick treat, these cones are perfect.
Your creativity can go beyond the recipe. Try adding caramel sauce, whipped cream, or more crushed vanilla wafers. For those with dietary needs, you can make a gluten-free version by changing cones and wafers. Each cone is a delicious 350-calorie treat that’s sweet, textured, and fun.
We encourage you to share your banana pudding cheesecake cones with friends and family. Post your creations and inspire others to try this delightful dessert. It turns simple moments into unforgettable culinary adventures.